Discover the straightforward steps to fix a bike chain, enabling you to get back on track swiftly and safely.
Fixing a bike chain can be a straightforward task with the right tools and knowledge. Whether the chain has slipped off the sprocket or a link has broken, this article provides a step-by-step guide to get your bike back on track.
From identifying the problem to the final adjustments, every detail is covered to ensure a smooth and successful chain repair. So, if you’re ready to roll up your sleeves and get your hands a little dirty, continue reading for the complete solution.
Key takeaways:
- Having the right tools is essential for bike chain repair.
- PowerLinks are a game changer for chain repair.
- Quick fix for a broken chain on the road or trail.
- How to repair a broken or bent chain.
- Fixing the chain without a spare link.
Necessary Tools for Bike Chain Repair
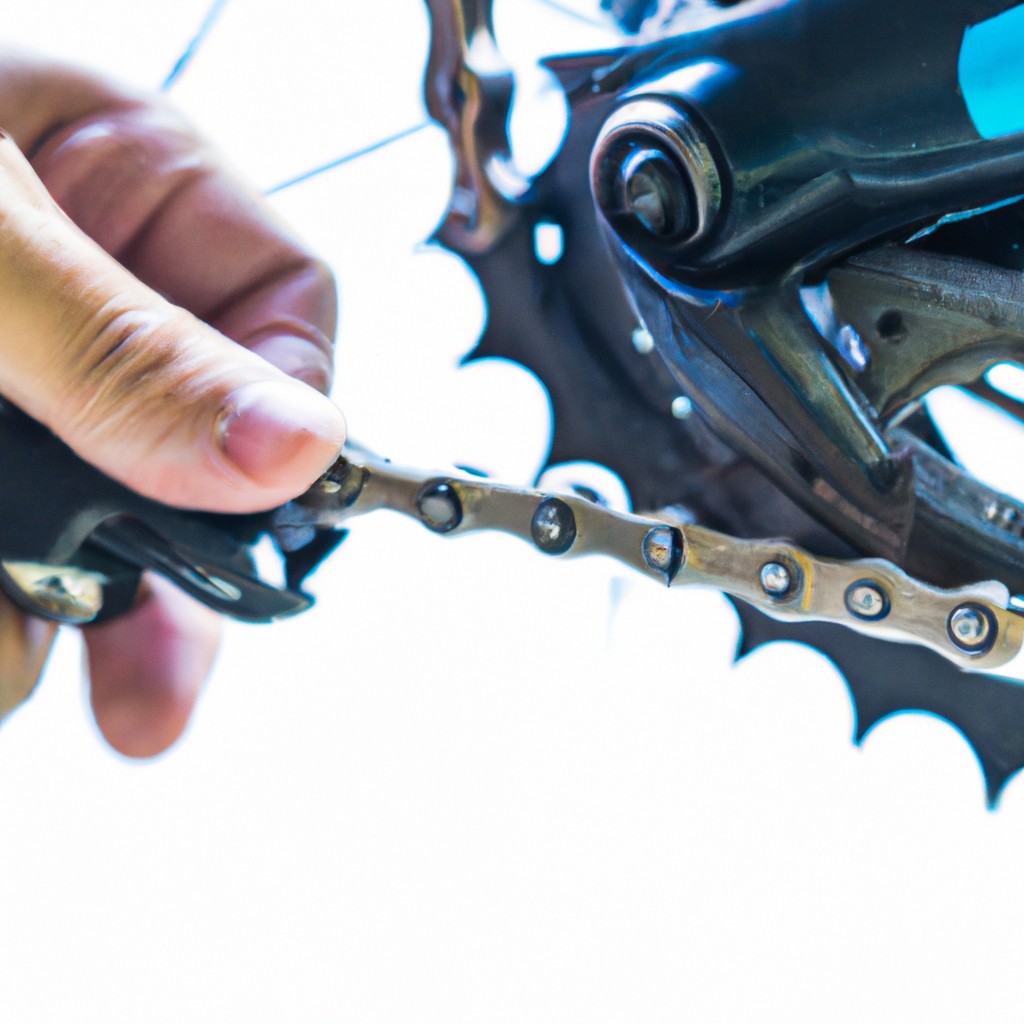
In the bid to get your bike chain up and running, having the right tools on hand proves essential. First on your list should be a chain tool. This handy implement is responsible for driving the pins out of the chain links, enabling you to remove or add links as required.
Next to consider is having a set of pliers. Used to hold chain links, a set of needle-nose pairs can be particularly effective. You may also need them when dealing with master links or quick links.
A third crucial tool, especially for those with master links, is the master link pliers. These specialized tools are designed to quickly and efficiently separate and reconnect master links.
Also, keep a chain wear gauge within reach. This instrument checks for chain stretch and wear, allowing you to pre-emptively replace a chain before potential breakage occurs.
Lastly, always have spare chain links or a quick link on hand. Depending on the situation, these could be your best bet for fast, efficient chain repair on the go.
The Function and Use of PowerLinks in Bike Chain Repair
PowerLinks, also referred to as quick links, are a type of master link with two interlocking pieces. These small yet vital bike components offer an easier way to detach and reattach your bike chain without the need for a chain tool.
Here’s a quick rundown on how they prove to be a game changer in bike chain repair:
- Simplified Process: A PowerLink connection simplifies both chain installation and removal significantly. You just snap it together or pull it apart. This, in turn, makes cleaning your bike chain and maintenance work a lot more straightforward.
- Compatibility: Most modern bike chains are made compatible with PowerLinks. Despite minor differences in design among brands, they all serve the same purpose — make your life on two wheels much easier.
- Emergency Repairs: Not only are PowerLinks useful for routine maintenance; they’re also a great tool to have on hand for an emergency fix. If your chain breaks while on a ride, carrying a spare PowerLink can get you back on the road quickly.
- Reusability: Some PowerLinks can be used multiple times, making them an economical choice. However, it’s critical to check the manufacturer’s instructions as some models are designated as single-use.
Remember, correctly using a PowerLink can make a considerable difference in the life and performance of your bike chain.
Quick Road or Trail-Side Fix for a Broken Bike Chain
When your chain breaks midway on your cycling adventure, a quick fix can get you going again. Essential factors to remember include:
- Safety First: Move off the riding path and ensure you’re safe from traffic or other cyclists.
- Chain Tool Utility: Utilize a chain tool to push out the rivet holding the broken link together. Make sure not to push the rivet all the way out, it’s needed for reassembly.
- Eliminate Damaged Links: Remove any twisted or damaged links. Maintaining a smooth, uniform chain is critical to your bike’s performance.
- Reconnect Chain: Fit the chain back onto the gears, align the ends of the chain on a solid link (not the one you removed). With the chain tool, push the rivet back in to connect the chain.
- Check Functionality: Once reassembled, run the bike through all the gears to assure everything is working fine.
This quick yet effective road or trail-side fix can ensure that a broken chain doesn’t cut your adventure short. Always remember, the top principle of this quick fix is deploying it safely.
How to Repair a Broken or Bent Chain
Firstly, prop your bike upside down, ideally on a bike stand. This will give you clear access. Carefully diagnose the whole chain loop to locate the defective link. Use a chain checking tool to ascertain if it’s stretched or a visual inspection if it’s visibly bent.
Should you require to remove the damaged link, use your chain tool. Place the pin of the chain tool at the defective link’s pin and turn the tool’s handle. This will push the pin out just far enough to break the link without completely removing the pin; losing the pin can cause more trouble.
In the case of a bent link, carefully straighten it with an adjustable wrench after it has been isolated. However, if it’s severely distorted, it’s advisable to replace it.
Remember, patience is crucial in this process. Bike chains are delicate, and heavy-handedness could lead to further complications.
For multiple defective links, repeat this process as needed. Ensure that the chain can freely pass through the derailleur and around the bike’s gear sprockets. Once fixed, the chain should be able to move without impediments or strange noises.
Fixing the Chain Without a Spare Link
Let’s dive straight into the method of fixing a chain without a spare link.
1. Loosen the Pedals: By turning the cranks backward, slacken the chain. Be mindful to avoid any undue pressure on the derailleur.
2. Identify the Problem Area: Look for the broken or stiff link. Once spotted, it’s ideal to have a chain-breaking tool on hand.
3. Position the Chain: In the chain-breaking tool, align the chain so the problem link is under the tool’s pin. Slowly turn the handle to push out the pin.
4. Break the Chain: Push the pin out partially until the chain breaks. Do not push out the pin completely as it will make reconnection more difficult.
5. Detach the Defective Link: Remove the broken link from the chain.
6. Reconnect the Chain: Align the chain ends. Apply pressure evenly until the protruding pin clicks back into the adjacent link.
Remember, this technique should only be used as a last resort in situations where a replacement link is simply unavailable. Keep in mind that a permanently altered chain may behave inconsistently or fail again, so it’s a temporary fix before getting a new link or chain. Also, it is essential to learn proper chain maintenance to avoid such emergencies.
Adding a New Chain Link to the Bike Chain
Start by identifying the damaged link. This could be a bent or twisted link, which you can easily disconnect using a chain tool. The chain tool pushes the chain pin out of its slot, allowing you to remove the faulty link.
Now, you’re ready to add a new chain link. Get the new link and align it with the empty space where the damaged link was removed. Using your chain tool, push the chain pin back into its slot to connect the new link to the rest of the chain.
Take heed that there are two types of links: male and female. Female links are hollow, allowing the male links, with their protruding pins, to fit in. Ensure the male end of one link connects with the female end of another.
Double-check your work to be sure the new chain link moves freely in sync with the remaining links. This guarantees an efficient cycling experience.
Lastly, lightly grease the new link. This not only minimizes wear and tear but also reduces the exertion of pedaling.
Regular Maintenance and Precautions to Avoid Bike Chain Issues
To extend the lifespan of your bike chain, scheduled cleaning and inspection should be a part of your routine. Dirt and grime accumulation causes additional strain on the chain while affecting its efficiency. Spray-on bike cleaners offer a quick solution and minimize friction.
Lubrication is a key aspect of chain maintenance. A well-oiled chain helps to preserve the links and prevent damage. Apply bicycle-specific lube after cleaning, especially if you ride often. Lubricate liberally, then rid the excess with a rag to avoid attracting dust.
Inspect the chain regularly for wear and elongation. After every 1000-2000 miles of riding, consider measuring the chain with a chain wear tool, popularly known as a chain checker. This device identifies if the chain has stretched beyond recommended limits, signaling the time for a replacement.
Avoid shifting gears under high load to protect your chain from snapping or bending. Practice smooth, and well-timed gear changing when your bicycle is under minimum load. Remember, preventions such as these reduce the probability of severe chain issues.
FAQ
What are the essential tools required to repair a bike chain?
Essential tools required to repair a bike chain include a chain tool, replacement chain pins or a quick link, and lubricant.
How often should a bicycle chain be inspected for wear and tear?
A bicycle chain should be inspected for wear and tear every 500 to 1,000 miles of cycling.
What are the significant signs that indicate a bike chain needs replacement?
Significant signs that indicate a bike chain needs replacement include noticeable wear out, difficulty in shifting gears, or the chain slipping off frequently.