Discover the simple steps to raise your bike handlebars for a more comfortable and ergonomic cycling experience.
Raising bike handlebars is a simple task that can greatly enhance your comfort and control while cycling. This article will guide you through a step-by-step process on how to raise bike handlebars, covering everything from the tools you’ll need to the adjustments for different types of bikes.
Whether you’re dealing with a road bike, mountain bike, or a hybrid, you’ll find the right solution here. By following these instructions, you’ll be able to customize your bike fit, ensuring a more enjoyable and safer ride.
So, let’s dive right into the details.
Key takeaways:
- Use the right tools: hex wrenches, screwdrivers, bike stand, measuring tape, grease.
- Understand the integrated system of your bike for proper adjustment.
- Adjust handlebar height by loosening stem screws and making small changes.
- Add or remove headset spacers to raise or lower handlebars.
- Flip the stem for a quick height adjustment, but consider overall comfort and control.
Tools You’ll Need for Handlebar Adjustment
To get started and accomplish the task efficiently, make sure the following tools are within your reach:
- Hex Wrenches: Also known as Allen keys, these are often used to tighten or loosen the bolts on your bike, particularly those that hold your handlebars.
- Screwdrivers: Some bikes might have screws instead of bolts, necessitating a screwdriver. Both flathead and Phillips-head screwdrivers could come in handy.
- Bike Stand: While not absolutely necessary, a bike stand can make the process easier and more ergonomic by elevating your bike.
- Measuring Tape: To ensure your handlebars are at the correct height, a measuring tape is useful.
- Grease: After adjusting, a bit of bike-specific grease can help keep everything running smoothly while preventing rust.
Even with the right tools in hand, remember: patience is key. Adjusting handlebars is not a race; firm and careful adjustments can prevent damage to your bike.
Understanding Bike’s Integrated System
Bicycles are built as an integrated system, meaning each part works harmoniously with the others. To grasp the idea of handlebar adjustment, think of it as a part of this bigger picture.
The handlebars, stem, fork, and frame height all contribute to your bike’s overall feel and fit. The upper body’s positioning, hugely controlled by handlebar heights, directly impacts the lower body placement on the saddle and pedal.
The balance of this ergonomic interconnection is pivotal to a successful adjustment, ensuring a smooth ride while minimizing the strain. Remember, a small change in one region may necessitate another in a different area to guarantee overall mechanical harmony.
How to Adjust the Handlebar Height On Your Bike
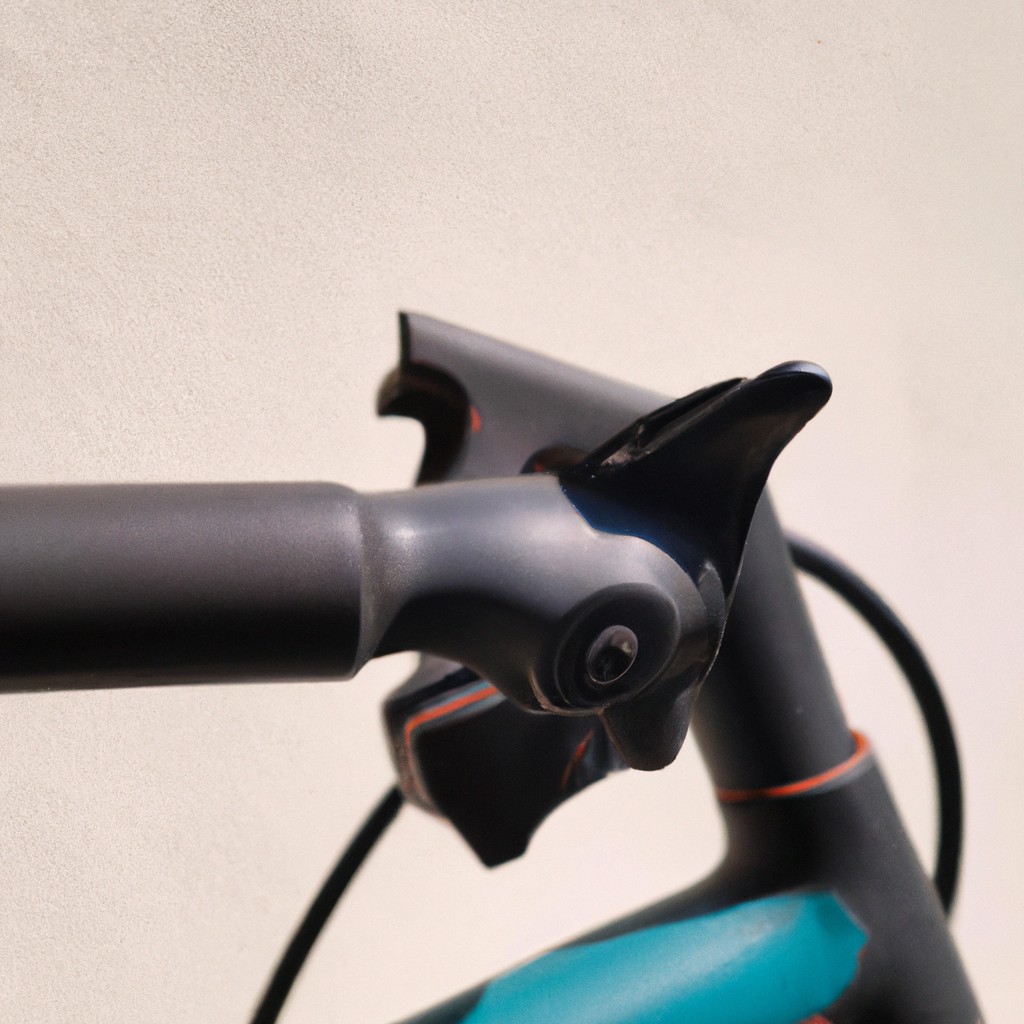
To begin the process, loosen the screw or screws on the bike stem found at the side. There’s usually one or two depending on the model. This screw connects the handlebar with the front fork.
Next, move the handlebars up or down to your desired height. This can be a bit of trial and error, so it helps to test the feel of the handlebar height with a quick ride.
By strictly adjusting a few millimeters at a time, an optimal height can be reached gradually. Don’t go overboard with major adjustments; the smallest changes can surprisingly have the biggest impact on your ride.
Once content with the handlebar’s height, ensure that they’re aligned with the front wheel to maintain control. Misaligned handlebars can disrupt the balancing efficiency, thus inducing discomfort and exhaustion.
Lastly, tighten the screws back into place. A fundamental step, the tightened screws secure the handlebar height, making it steady and safe for the cyclist. Use good force but take caution not to over tighten as it could damage the stem or threads.
In the ever-evolving pursuit of comfort and efficiency in cycling, adjustments such as these allow for a more individualized experience on the bike.
How to Add or Remove Headset Spacers
Begin by loosening the bolt on the top of the stem until it releases but do not fully remove it. Now, proceed to loosen the side bolts. The stem should easily slide off the fork’s steerer tube. Be careful in this step and keep a hand on the stem to prevent it from falling.
You’ll see the headset spacers stacked on the steerer tube. To raise your handlebars, add spacers under the stem. If you want to reduce the bar height, remove a few spacers. It’s highly recommended that the spacers’ total height should not exceed the length of the steerer tube for maximum stability.
After adjusting the spacers, replace the stem onto the steerer tube. Tighten the top bolt to set the stem in position but do not fasten it just yet. Aligning the stem with the bike’s front tire, tighten the side bolts. Only then do you finish tightening the top bolt. This system ensures an accurately positioned and secured handlebar.
Remember that after any adjustment, take a short test ride to ensure you are comfortable with the new handlebar height. Adjustment precision, just like cycling itself, requires practice. Don’t be discouraged if it takes some trial and error to find your perfect fit. Your comfort and safety are of utmost importance.
How to Adjust the Height of a Quill Stem
To get started, you’ll need to locate the bolt on the top of the quill stem. Loosen this bolt with an Allen wrench, but be careful not to remove it completely. With the bolt loosened, you can adjust the height of the stem. Try to raise or lower in small increments, testing the new height before making drastic changes. Remember the golden rule: the minimum insertion point should always stay within the frame for safety reasons.
Once you’re satisfied, retighten the bolt to secure the stem in place. This process is quite straightforward, but it’s crucial to maintain the correct balance between comfort and control while riding.
How to Flip the Stem On Your Bike
To start the flipping process, locate and loosen the stem bolts at the side of the handlebar using an Allen key. After loosening these bolts, the handlebar should be free to move, be careful not to disrupt the brake cables.
Next, remove the top cap at the center of the handlebars. This cap secures the stem to the bike and once removed, the stem should be free to rotate.
Now, flip the handles, rotating the stem 180 degrees so it faces upward. Make sure the handlebars are straight and aligned with the front wheel before tightening the bolts back again. Ensure that the stem is firmly secured but not overly tightened to avoid damaging the bolts.
Inverting the stem is a quick and efficient way to gain some height on your handlebars. However, remember that this adjustment should be carried out considering the overall comfort and control while riding. Ideally, your handlebars should be at a comfortable level where your hands rest naturally, keeping the body weight evenly distributed and the ride enjoyable.
Troubleshooting Handlebar Adjustment Issues
While adjusting the bike handlebars, several issues can arise, creating hurdles and dissatisfaction in your riding experience. Here are some common issues and handy solutions to consider:
1. Handlebar Doesn’t Stay in Place: If your handlebars move or slip when you apply pressure, it’s likely due to inadequate tightening. Inspect the stem bolts and ensure that they are firm enough to hold the handlebars steady. However, avoid over-tightening which can damage the stem.
2. Uneven Handlebars: Make sure the handlebars are centered and aligned with your front wheel. Loosen the stem bolts slightly and reposition — remember to tighten the bolts afterwards.
3. Squeaking Sounds: If you hear a squeaking sound while riding, the stem bolts may need lubrication. Remove, clean, and apply lubricant before reinserting them.
4. Twitching or Instability: If the handlebars twitch or feel unstable while riding, it may be a sign of a loose headset. Check if the headset is correctly installed and adjust if necessary.
These troubleshooting tips should secure your comfort during rides and ensure optimal use of your bicycle’s functionalities.
FAQ
What is the correct handlebar height?
The correct handlebar height is about 5-6 cm below the mid-point of the saddle for a performance road position, and level with or a couple of centimetres below the mid-point of the saddle for a recreational road bike position.
What are the tools required for adjusting bicycle handlebars?
To adjust bicycle handlebars, one needs a set of Allen wrenches of appropriate sizes, typically ranging from 4mm to 6mm, and possibly a torque wrench depending on the bike model's specifications.
How does handlebar height affect the ride comfort and efficiency?
The handlebar height affects ride comfort and efficiency by modifying cycling posture – lower handlebars lead to a more aerodynamic position for speed and efficiency, while higher handlebars provide more upright posture for comfort on longer rides.
What are the different types of bicycle handlebars and how do they impact handlebar height?
Bicycle handlebars come in various types such as drop bars, flat bars, bullhorns, and cruiser bars, each extensively influencing the handlebar height which affects the cyclist's posture, comfort, and cycling aerodynamics.