Pumping a bike tire properly can greatly improve your cycling experience, and this article provides easy-to-follow steps on how to do it correctly.
Pumping a bike tire is a straightforward process that can be mastered in no time. This article will guide you through the steps, from identifying the type of valve your bike has, to choosing the right pump, and finally, inflating the tire to the correct pressure. With clear instructions and helpful tips, you’ll be able to maintain optimal tire pressure, ensuring a smoother and safer ride.
So, whether you’re a seasoned cyclist or a beginner, stick around for a comprehensive guide on how to pump a bike tire.
Key takeaways:
- Schrader, Presta, and Dunlop/Woods are the three types of bike tire valves.
- Each valve type has unique features and requires a specific pump.
- Choosing the right pump based on compatibility and PSI capacity is crucial.
- Follow the steps of attaching the pump, inflating the tire, and securing the valve.
- Regularly check tire pressure for safety and optimal performance.
What Valve Does My Bicycle Have?
Bikes typically have one of three types of valves: Schrader, Presta, or Dunlop/Woods.
Schrader valves are similar to those on car tires, thicker and have a central pin you can press to release air. They are common on mountain bikes and some road bikes.
Presta valves, on the other hand, are usually found on high-performance bikes as they are lightweight and have a locknut at the tip that you can loosen to add or release air. They are longer and thinner than Schrader valves.
Lastly, Dunlop or Woods valves are less common these days but can still be found on some city bikes and bicycles in Asia and Europe. They’re about the same thickness as Schrader valves but have a narrower top, similar to a Presta valve.
Identifying which type of valve your bike uses is vital to ensure successful inflation. The type of valve will also dictate the kind of bike pump needed.
Differences Between Presta, Schrader, Dunlop/Woods and Tubeless Valves
Delving deeper into the world of bicycle tire valves, there are key differences that set them apart, involving their usage, construction, and method of securing air inside.
The Presta valve, often found on road bikes, boasts a sleek and slender design to accommodate narrower wheel rims, with a small opening locked by a nut that you unscrew when inflating.
In contrast, the Schrader valve, a standard on everyday vehicles like cars and mountain bikes, has a broader build and includes a spring mechanism. This feature allows you to press on the valve’s top to release or pump in air, akin to a car tire.
Next, the Dunlop or Woods valve, predominately used in Asia and Europe, bears similarity to the Schrader in design but functions like a Presta, using a removable core locked with a small rubber part.
Lastly, tubeless valves differ slightly. Predominantly used on tubeless-ready mountain bikes, they lack an inner tube, resulting in lower rolling resistance, greater comfort due to lower tire pressures, and less likelihood of puncturing.
Understanding these unique features and mechanics is critical in structuring a seamless tire pumping routine, one that keeps your ride smooth and worry-free.
The Importance of Knowing Your Bicycle’s Valve Type
Identifying your bike’s valve type is a key step in efficient tire inflation. Each type of valve, including Presta, Schrader, and Dunlop, function slightly differently and require different types of pumps for tire inflation.
For instance, Schrader valves are commonly found on lower pressure tires like those on mountain and kids’ bikes. Their wider diameter allows for faster inflation but less precise pressure adjustments.
Conversely, Presta valves, typically seen on high-pressured road bike tires, impress with their small diameter and super-precise pressure adjustment.
Lastly, the Dunlop valve, less common but often found on bikes in Asia and Europe, is renowned for its reliability. These valve types are not interchangeable and using the incorrect pump can cause potential damage, making it crucial to properly identify them.
Selecting the Right Pump for Your Bike Tire
Several factors come into play when choosing the appropriate pump. A pump compatible with your bike’s specific valve type—Presta, Schrader, or Dunlop/Woods—is crucial for effective tire inflation. Beyond compatibility, consider its PSI capacity; the pump should meet or exceed the maximum pressure your bike tires require.
Track pumps, known for their high capacity, accuracy, and ease of use, are ideal for home use. They usually feature a pressure gauge for precision and comfortable handles for effortless pumping.
On the flip side, mini pumps are compact and lightweight, making them invaluable on-the-go tools during bike trips. They come in handy for emergency top-ups and unforeseen punctures, despite requiring more effort due to their small size.
Lastly, if you often find yourself in bike races, a CO2 inflator might be beneficial. These devices use compressed carbon dioxide to inflate tires instantaneously, saving precious seconds during competitions.
The right pump not only facilitates routine bike maintenance but can also drastically improve the riding experience by ensuring optimal tire pressure. Remember, convenience, compatibility, and situations you frequently find yourself in as a cyclist should guide your choice.
Steps to Inflate a Bike Tire Properly
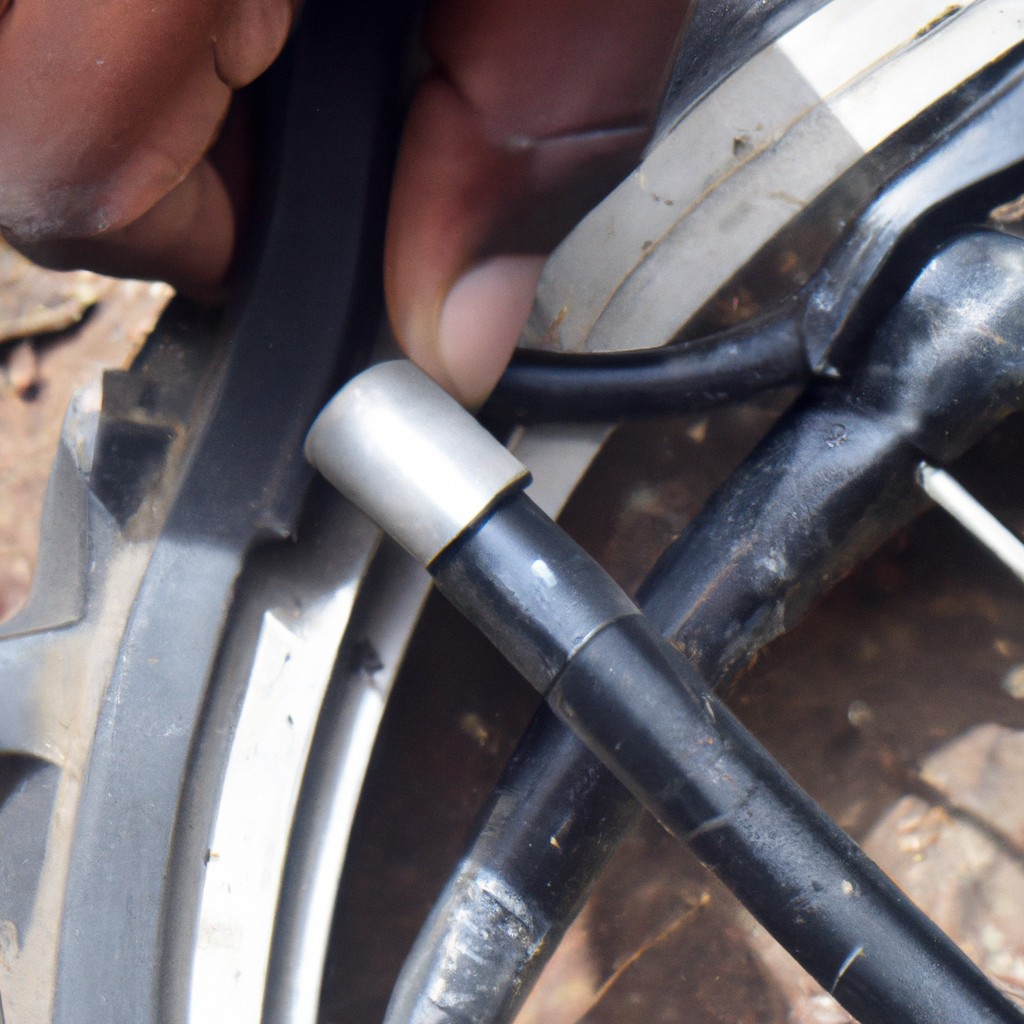
Begin by removing the dust cap from the valve, then loosen the small nut at the top of the valve if you have a Presta valve system. For Schrader valves, skip this step.
Next, fit your pump onto the valve. If you’re using a dual-head pump, make sure to use the correct hole. Push the pump head onto the valve, twist or pull the locking lever to secure it in place.
Now, slowly start pumping. Check the gauge on your pump to monitor the tire pressure. Each tire has a recommended PSI (Pounds per Square Inch), usually inscribed on the wheel rim or the side of the tire. Inflate until you reach the optimal pressure.
Once you’ve reached the correct PSI, carefully remove the pump to avoid releasing too much air. Fasten the small nut, if previously loosened, and replace the dust cap. Continue with the next tire.
And that’s it, your tires are properly inflated and ready for a smooth and efficient ride!
How to Use a Track Pump
Begin by placing your track pump near the bicycle tire that requires inflation. Ensure that the pump’s base is on firm ground, allowing you to efficiently apply pressure. Next, remove the valve cap and fully extend the pump’s hose length.
For a Schrader valve, push the pump’s head onto the valve and flip the lever up to create a tight seal. In case of a Presta valve, unscrew the tiny nut at the top of the valve before pushing on the pump. Screw or flip on the pump head as per the design.
Once you’ve firmly attached the pump, stand over the pump base and use both hands to grasp the handle. Start pumping using smooth and full strokes to quickly raise the pressure.
Most track pumps come equipped with a pressure gauge, making it easy to monitor inflation levels. Observe the PSI and stop pumping when you’ve reached the manufacturer’s recommended PSI level.
Once achieved, quickly remove the pump head by reversing the attachment process and replace the valve cap. Your tire should now be ready to offer a smooth and safe ride.
Benefits of a Mini Pump On Trips
While a track pump delivers optimal pressure at home, you might find a mini pump to be your best companion during biking trips. These compact pumps can easily slip into your backpack or can be mounted onto your bike frame, taking minimal space.
Firstly, they are lightweight yet sturdy – a trait that ensures they are not a burden during your cycling adventures. Secondly, their design caters to both Presta and Schrader valves, making them universally fitting.
Another advantage is the immediate accessibility. Punctures are unpredictable and having a mini pump at your disposal guarantees immediate tire inflation, reducing the downtime during a ride.
Lastly, modern mini pumps are equipped with a flexible hose – a feature that protects the valve from potential damage during vigorous pump action. Remember, efficiency isn’t just about the size, but the speed in restoring your bike to road-ready condition.
When to Use a CO2 Inflator
A CO2 inflator isn’t a routine option, but it can become a lifesaver when time is essential. Commonly used by competitive cyclists, it provides a rapid, convenient means of tire inflation. Filled with compressed gas, this device instantly inflates a flat tire.
Two primary types exist: one with a knob to control the flow, the other releasing all the gas in one go. For the latter, accuracy in positioning is vital because, once initiated, it cannot be stopped until empty. It’s essential to make sure the inflator is correctly attached to the valve to prevent any gas escaping during inflation.
It should be noted, while CO2 inflators are efficient, they’re for emergency use rather than regular maintenance. The gas tends to dissipate through the tire walls more quickly than air, meaning the tire will run flat sooner. Always re-inflate with air using a standard pump when possible.
Last but not least, the cartridges are single-use only. After inflating a tire, the remaining CO2 in the used cartridge can’t be saved for later. Always carry spare cartridges if opting for this method, to ensure readiness for any unexpected flats.
Preparation Steps Before Inflating: Valve Check and Release
Before you get started with the pumping process, it’s important to carry out a quick valve check. Firstly, ensure that the valve is clean and free from dirt or debris – this can prevent proper inflation and lead to damage down the line. You can do this with a quick wipe-down using a clean, damp cloth. If you’ve got a Presta valve, make sure to unscrew the tiny top valve as this will allow the air to enter and exit the tire.
Next, release a small amount of air out of your tire to clear any dust or dirt from inside the valve. This will enhance the accuracy of the reading when setting your tire pressure. You can do this by either pressing down on the valve if it’s a Schrader, or unscrewing the top and pressing down for a Presta valve.
Lastly, ensure that the tire is securely fitted on the rim. Now your bike is ready to be inflated to the appropriate PSI! Remember, preparation is key to getting the most out of your cycling experience – a thoroughly prepped tire will lead to a smoother, safer ride.
Attaching the Pump to the Bike Tire Valve
First, be sure to remove any dust cap on the valve. For Presta valves, there’s an additional step – loosen the small brass or silver plunger at the valve tip.
With a firmly secured pump nozzle, it’s time to start inflating. Ensure no air is escaping around the nozzle. If it does, adjust the pump fitting—the presence of air indicates a less-than-ideal fit.
When using a mini-pump or a CO2 inflator, remember they require a bit more effort or finesse. Remember, patience does pay off when it comes to managing these compact lifesavers.
Pump Pressure Guide: What PSI Should Bike Tires Be?
It’s critical to inflate your tires to the correct pressure. This information, measured in Pounds per Square Inch (PSI), is usually imprinted on the tire’s sidewall.
Mountain bikes, with their wide tires, typically require a PSI of 30-50. For a hybrid tire, a good PSI range is 50-70. Road bike tires, being narrow, demand a higher PSI; usually between 80 and 130.
Cyclists should know, however, that these are general guidelines. The ideal PSI can depend on factors like the rider’s weight or road conditions.
Always ensure your pump gauge is accurate to maintain optimal tire pressure. A mismatch in your tire’s PSI can lead to a myriad of cycling issues, so regular checks are a must.
How Often Should I Pump Up My Tyres?
Proper tire pressure isn’t a set-it-and-forget-it aspect; it requires frequent attention. The frequency depends largely on the type of bike and the tire construction. Road bikes, with their slender high-pressure tires, typically require a top-up every few days. On the other hand, mountain bikes and hybrid bikes, outfitted with wider low-pressure tires, often hold their pressure for a while, making a weekly check-up sufficient.
Factors like tire pressure loss over time and temperature changes also determine the frequency of inflating your tires. Remember, colder weather can cause the pressure inside the tires to drop, requiring more frequent inflation. Hence, in winter months, it might be wise to check your tire pressure more often.
Further, always check your tire pressure before long rides to ensure optimal performance and durability. A quick tire squeeze is a decent on-the-go check, but for accurate results, consider using a tire pressure gauge. Remember, maintaining the right pressure can make all the difference to your ride, offering improved comfort, performance, and safety.
Understanding Why Regular Tire Inflation Is Crucial for Biking Safety
Proper tire inflation contributes significantly to a safer and more efficient cycling experience. Over-inflated tires result in reduced traction, making uncontrollable skidding a possibility – a latent hazard especially during turns or on wet roads. On the other hand, under-inflated tires increase rolling resistance which makes pedaling harder and leaves your wheels prone to premature wear and tear, resulting in punctures.
Another crux is the bumpy ride that under-inflated tires result in, leading cyclists to lose control or even fall off their bikes on rocky terrain due to poor shock absorption. Meanwhile, correct inflation optimizes the tire ‘footprint’ – the contact area with the ground – ensuring better grip, smoother rides and reducing the risk of unexpected punctures. Moreover, punctually checking tire pressure helps identify any slow punctures, saving you from an unforeseen deflated tire during a ride.
On a more technical note, the ideal pressure varies depending on factors like rider’s weight, tire width and riding conditions. Regular inflation checks allow personalized adjustments aligned with these parameters, thus optimizing the bike’s performance and ensuring your safety.
FAQ
What are the different types of bike tire valves and how do they function?
Bike tire valves comprise mainly two types – Presta and Schrader, where the slender and taller Presta is commonly seen on road bikes for its ability to hold higher pressure, while the wider Schrader, often present on mountain and kids bikes, is recognized for its ease of use and universal pump compatibility.
How can one identify the right pressure for various types of bike tires?
The appropriate pressure for any bike tire can be identified by checking the recommended PSI (pounds per square inch) range printed on the side of the tire or specified in the bike's manual.
What are the essential tips to remember when maintaining bike tire pressure?
Essential tips for maintaining bike tire pressure include checking regularly with a reliable gauge, adhering to manufacturer’s pressure guidelines, accounting for riding conditions and style, and understanding the effects of temperature on tire pressure.